Update Holiday Greeting in Elevate Admin Portal

Tired of playing ‘Phone Tag’ with your holiday hours? Or worse, leaving callers in the dark when you’re off decking the halls? This guide’s got your back! Updating your holiday greeting and auto attendant settings in the Elevate Admin Portal is easier than untangling Christmas lights (and way less frustrating). Whether it’s setting festive hours, adding a new greeting, or making sure callers get the memo that you’ll be back after a cozy winter break, we’ll walk you through every step. Keep your business prepared to handle calls and keep the lines clear—even when you’re away!
Managing communication settings is simple. With the Elevate Admin Portal, making adjustments to your auto attendant, business hours, and holiday schedules is straightforward and ensures your clients stay informed. Let’s walk through some essential steps, with references to the Elevate Admin User Guide for easy guidance.
1. Accessing and Updating the Auto Attendant
- Logging In: To get started, access the Elevate Admin Portal through Intermedia, clicking on Customer Login > For Admin.
- Navigating Auto Attendant Settings: Go to the Auto Attendant section from the left menu. Select the main number or any additional lines that need adjustments.
- Editing Hours of Operation: Adjust business hours by clicking on the three dots (•••) next to Working Hours. This allows you to set custom hours, for example, for summer schedules or weekend availability.
2. Configuring Greetings and Menu Options
- Uploading New Greetings: Easily record or upload a new greeting by selecting Auto Attendant > Main Line. Click X on the current greeting to remove it, then upload your updated file.
- Customizing Menus for Callers: Tailor the menu options (like “Press 1 for Sales”) to fit your needs. Redirect or remove each option in real-time—no extra saving needed.
3. Receptionist Group Management
- Setting Up Receptionist Groups: For companies routing calls to a receptionist or a specific group, create or update groups by selecting Groups from the left menu. This directs calls to the right person.
- User Assignments: Add or remove users from these groups as needed. Go to Agents > Check the Box next to the name and Add or Delete accordingly.
4. After-Hours and Holiday Routing
- Configuring After-Hours Menus: Create a unique after-hours greeting to inform clients of expected response times or alternative contacts. Select After Hours in Auto Attendant to edit.
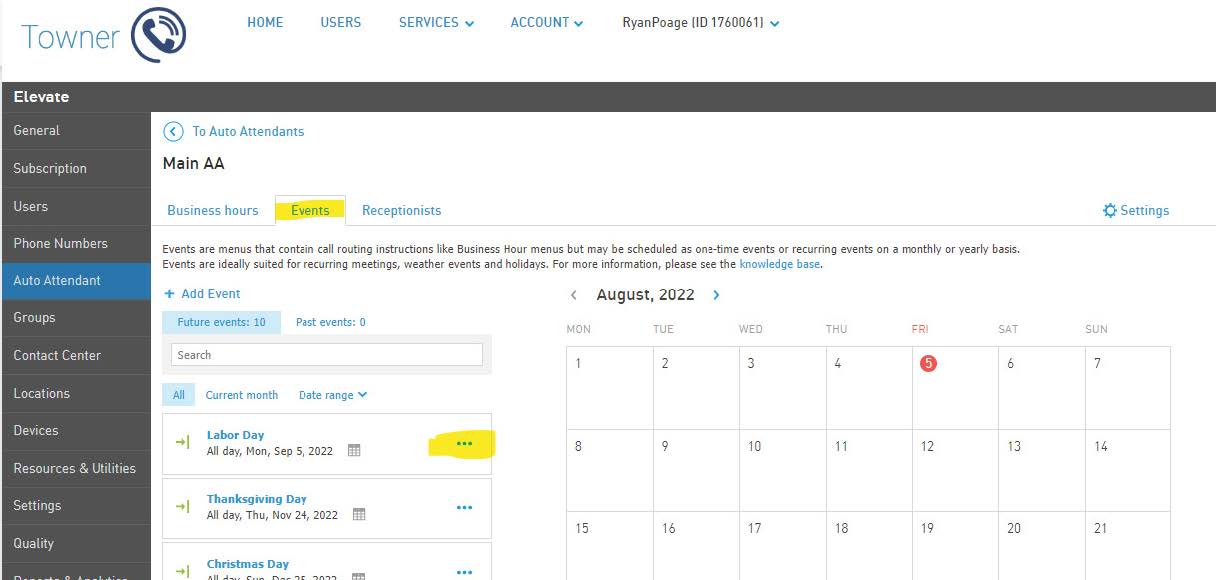
- Setting Up Holidays: Navigate to Events to add holidays. You can select Add Event for dates like Thanksgiving or create a custom entry. Customize routing options to provide clients with appropriate messaging during these closures.

5. Utilizing the Calendar View and Maintaining Accuracy
- Holiday Visibility with Calendar View: The calendar highlights closed dates. If you notice a missing closure, add it under Events by selecting National Holiday or creating a custom event.
- Disabling Unneeded Holidays: Sometimes, certain dates may not require closure. To remove, click Events > three dots (•••) > Disable or delete.
6. Need Assistance? Resources and Support
- For additional help, Towner Communications offers quick guidance. Visit our website for more online training videos or reach out to our support team at service@townerkc.com.
The Elevate Admin User Guide serves as a valuable resource for these steps and more. Download it to ensure smooth communication updates across your organization, maintaining efficiency and keeping your clients in the loop.


